Showing posts with label texture. Show all posts

Sunday, 11 October 2015

Making Tyvek Lace

I saw this short video on making lace with Tyvek and had to immediately try it.

Results not too shabby:


Not terribly successful but you learn from mistakes


Shown under the baking parchment

Shown still stuck to the stamps, cooling

I used the printing blocks/stamps I'd made in my August post on visual exercises.

A few learnings:

  • set the iron between wool and cotton
  • use rubber stamps (try one out beforehand) - I used this Super Soft Lino Block
  • use baking parchment above and below
  • be fast and press hard
  • let the stamps cool after a few uses before carrying on

I love the randomness of the results even when you get the technique under control.

Really exited about the possibilities.


Saturday, 8 August 2015

Flour Resist with Dye and Fabric Inks

I've been getting interested in resists and tried out flour paste as a means to enhance printing and dyeing.

It's quite easy but takes a bit of time.

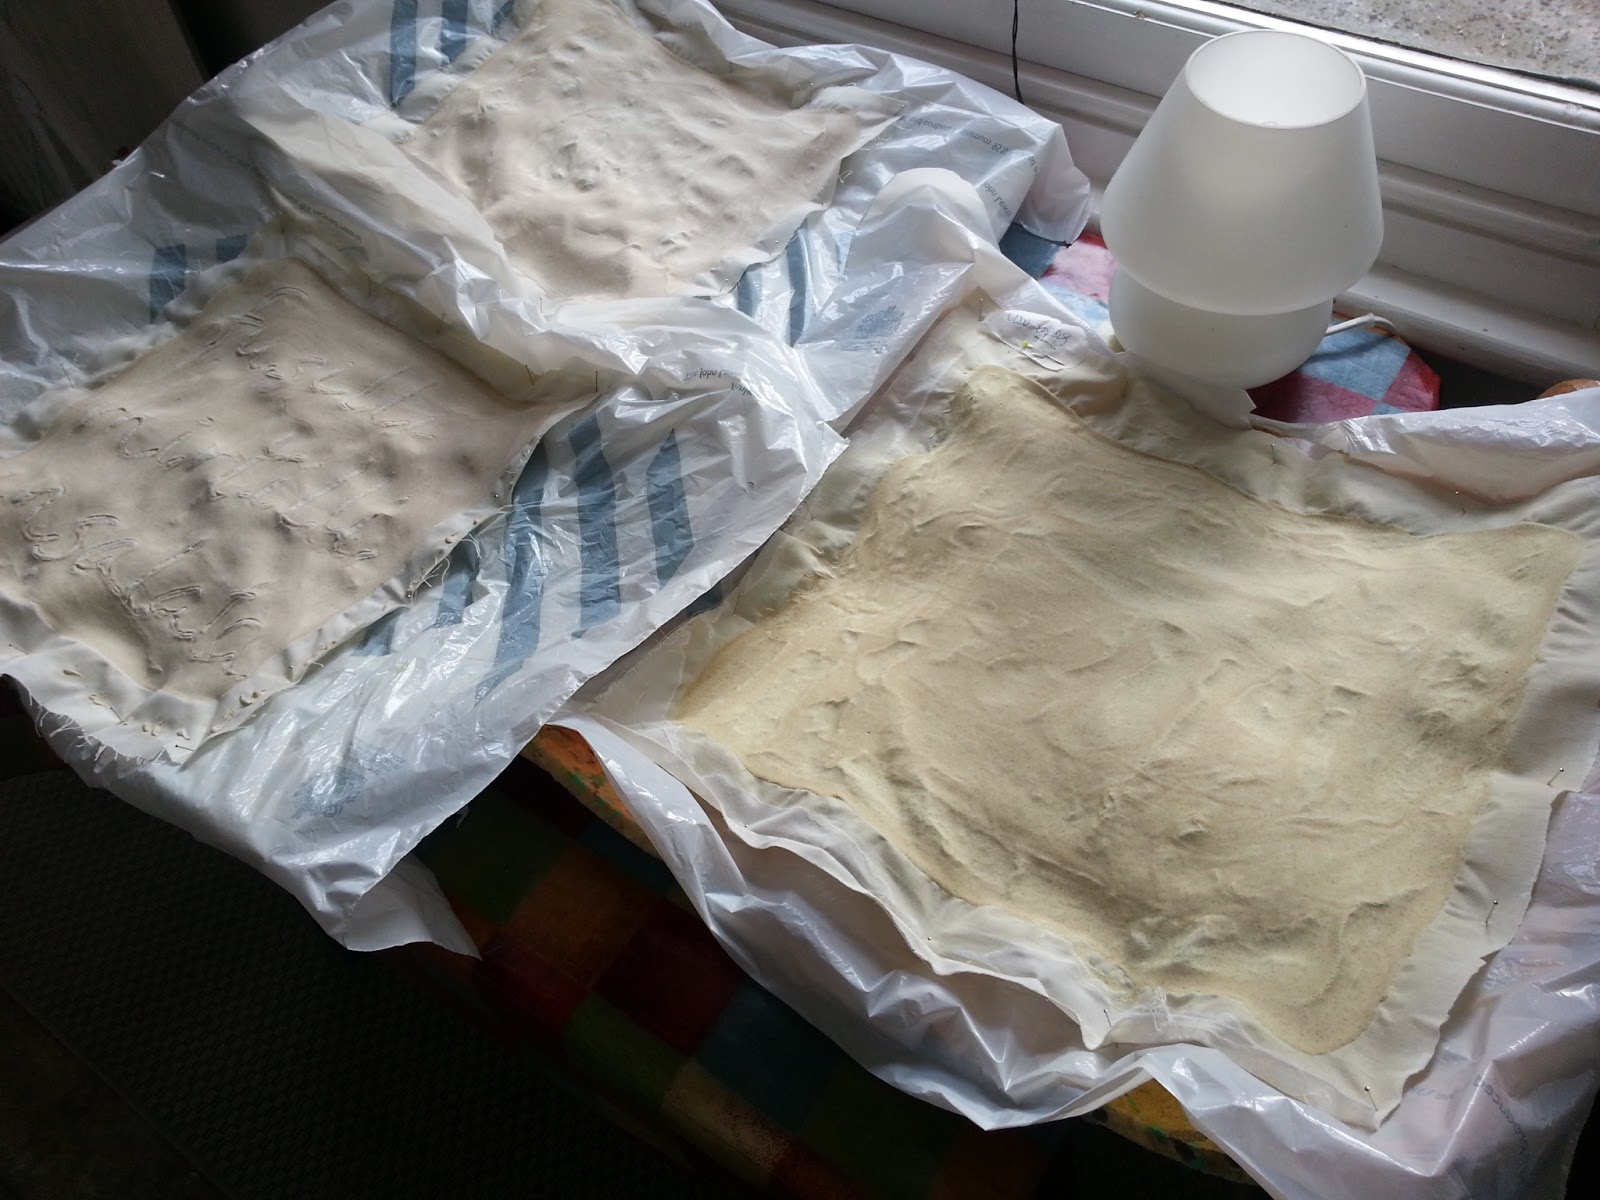
Pin out a piece of cloth onto a sheet of plastic and onto something with give (I used a scrap of carpet underlay) - as the cloth dries it will shrink so the 'give' is important

Mix 1:1 flour and water - it should drip out in a solid fast drip as per the picture

I spread the mix out with the back of a spoon

Some tools to mark make  

I wrote out some words with a kebab stick

Some more mark making with a cookie cutter

Drying out in the airing cupboard - beware, the smell of the flour mix will linger for months after

When the paste is dry it has a kind of sheen on it

Detail of the dried marks

You can see the curvatures of the shrinkage and how it tugs at the pins

Detail of the marks

Scrunch up the cloth

Cloth after scrunching - brush away the 'crumbs'

I used fabric paint with a brush, really pushing it into the cracks

The back of the cloth once painting has started (I should have put a protective piece of plastic on the table)

This is the same but with dyes

The dyed piece ready for drying and batching

The dried fabric painted cloth - I have started crumbling off the flour

Flour mostly removed

Detail of the cloth - I've left little bits of the flour for texture

I tried removing the flour by washing instead with the dyed piece but it gets very 'gluey'

The finished dyed piece has some delicate colouring

The finished painted pieces - front and back

Beware of flushing the flour mix crumbs down your sink or in your washing machine as it could block your drains.

I found the results really interesting and have used one piece already to resolve.

Here are some other things you can do with flour resist:

Leslie Tucker Jenison Flour Paste Resist turorial

Maree Martin on YouTube

Jamie Kalvesrtan Design

Jane La Fazio


Saturday, 6 June 2015

A Fun and Productive Visual Exercise


The goal is to "explore value, colour and textural arrangements within a composition, using a random selection of elements within a structured collage format."

This is how it works:

Step 1: make a selection of  same sized coloured or patterned paper - I've used these Japanese papers I had but in the end there was probably too much white on them; best to use something where the colour goes right across. Ideally, also, use more than 4 as you'll have more mixing choice later.

Step 2: cut a shape out from the whole stack - I've used a template. 

Step 3: exchange the cut out shapes - I wanted to do this randomly but found I couldn't!

Step 4: tape everything together.

Step 5: now cut a line - straight or curved - right across the whole stack.

Step 6: join the halves up randomly

Keep going cutting shapes and lines from the stack until you want to stop.

I ended up with this which actually joined two of the 'pieces' together as one.

There are of course lots of variations and the exercise goes on to explore what you can do with the pieces you end up with.

Here are some more:

Each one of these is A6 sized. 

This is something I tried in Paint out of curiosity - the line is a little wobbly but it captures the gist.

Some of these came out well. The bottom two were the ones I liked least as they were progressing but there's something 30s-ish about them that I don't mind now. Persevere!

Now that I look at the one above having made a montage of thumbnails I am really liking the way the top three rows work together at that scale. And I especially like the second row right hand piece.

I didn't like the end result of this one at all but it ended up in my sketchbook and then I started to doodle with some pastels around it and ended up with all this.

As an aside, I have been to see the Sonia Delaunay exhibition (read a Guardian review) and it has definitely influenced an interest in repeating pattern along the lines of wallpaper (above and below).

This colour scheme is inspired by some wallpaper I saw at work - this photo doesn't do it justice - which had a mix of colours I would never have put together: vibrant electric blue with red and terracotta.

I got a lot out of doing this exercise just in terms of using one of the pieces to suggest something different. But I'm sure there's lots more potential to unlock, just that I'm not able to see how to yet.

But I will learn.

Do you have any exercises you do that get you going?